Contact Us

Have questions?  Use this form to contact us.

We will respond to you as soon as possible.

Thank You,

Gary Detonnancourt


Harrisville, RI 02830
United States

More Than A Snapshot provides online photography education.

Booth Bay Harbor 2013-5410-color enhanced.jpg

Blog

This is the blog for More Than A Snapshot's Online Photography Classes.  In these blog posts I will give photography tips, tutorials, and show images.

Filtering by Category: Image Editing

Skylum Announces Luminar Neo

Gary Detonnancourt

What’s new
Dust Removal AI
Lens or sensor let you down? Automatically remove evidence of lens and sensor dust from your photos.

Before Dust Removal AI

After Dust Removal AI

Line Removal AI
Line Removal AI gives you perfect pictures with zero effort. Remove unwanted powerlines from skies and put more focus on your subjects just in one click.

Before

After

Overlays
Luminar Neo includes built-in overlays and object libraries which allow artists to start creating layered compositions right out of the box.

Before

After

Relight AI

Before

After

Portrait Background Removal

Before

After

Mask AI

Sample mask in red.

Luminar Share
Luminar Share allows you to easily transfer photos edited in Luminar Neo from desktop to mobile and share them to your social channels quickly and easily.

Pricing
Starts: October, 18 (8am New York Time)
Ends: November, 17 (8am New York Time)

For artists making a new purchase:
$76 for 1-seat license for Luminar Neo
$87 for 2-seats license for Luminar Neo

$105 for 1-seat license for Luminar Neo+Luminar AI
$126 for 2-seats license for Luminar Neo+Luminar AI

Click here to pre-order

For artists who own Luminar or Aurora:
$54 for 1-seat license for Luminar Neo
$69 for 2-seats license for Luminar Neo

Click here to pre-order

$83 for 1-seat license for Luminar Neo+Luminar AI
$108 for 2-seats license for Luminar Neo+Luminar AI

Click here to pre-order

*30-day refund policy valid upon shipment of Luminar Neo this winter

What to Consider When Choosing a Monitor for Photo Editing

Gary Detonnancourt

If you’re a professional photographer, you understand that not every monitor can represent your photos to your liking. Not all monitors are built the same, and some can make your photos look dull and lifeless. For this reason, it’s important to invest in a monitor that is specifically designed for color accuracy and professional use. After all, why would you want to spend all your time perfecting your photography skills and taking breathtaking photos only to be viewed on a low-quality monitor?

With that said, we’ve listed below our top considerations when buying a monitor for photo editing.

Panel Technology

The panel of the monitor is essentially what’s known as the screen. This is made up of layers of glass substrates, a color filter, and liquid crystal (LCD). The kind of panel technology can affect how your monitor looks because the orientation of liquid crystals differs per panel type. First, you have twisted nematic (TN) panels that have fast response times and lessen the ghosting effect in moving pictures — making them perfect for gamers. Then, you have vertical alignment (VA) panels which are boosted by powerful PCBs — allowing the components and conductors to be included in one vehicle. Lastly, you can choose in-plane switching (IPS) panels, which trump both TN and VA panels in viewing angles and color reproduction. However, IPS panels often come with a higher price tag.

We suggest that you look into VA and IPS panel monitors when choosing one for photo-editing, as both offer good color and contrast. There are differences between the two, but ultimately, it all comes down to personal preference.

Gamma Preset Option

Put simply, how vibrant an image appears on-screen is dependent on a monitor’s gamma. Aside from that, adjusting a monitor’s gamma also allows you to have control over the contrast. If your monitor has a high display gamma, you can easily view darker images with greater contrast and nuance. Usually, most monitors have a permanent gamma preset gamma of 2.2, which is considered as the gamma sweet spot. However, professional monitors allow for gamma correction, which is a feature utilized by many photo editors to adjust how a picture will be displayed on a particular screen. If your photos are going to be viewed on a lower-quality screen, you’re going to want to have the ability to calibrate the gamma to avoid it from looking too dark or washed out.

Size and Resolution

When editing photos, it’s best to leave plenty of room for your toolbars. Everyone’s photo editing workflow varies, but essentially, you’re going to want to have a monitor that isn’t too big or too small. Experts advise that your monitor should be at least 24-inches, so you can edit your photos with ease. Additionally, adding a second monitor is a great idea, too — especially if you want to multitask and do more things with your computer.

Apart from the size, you should also keep in mind the screen resolution when picking out a monitor. The higher the screen resolution of a monitor, the more data it can fit on your screen. Simply put, this means that you can see more of what you’re working on without having to scroll a lot.

Having a great monitor allows you to further perfect your photography and photo editing craft. Whether you’re adjusting the shadows and highlights or adding texture overlays to your photos on photoshop, investing in the right monitor can help see your photos better and allow you to create higher quality work.

Luminar AI 1.2 Update - with AI Sky 2

Gary Detonnancourt

Improved Sky AI with reflections and more

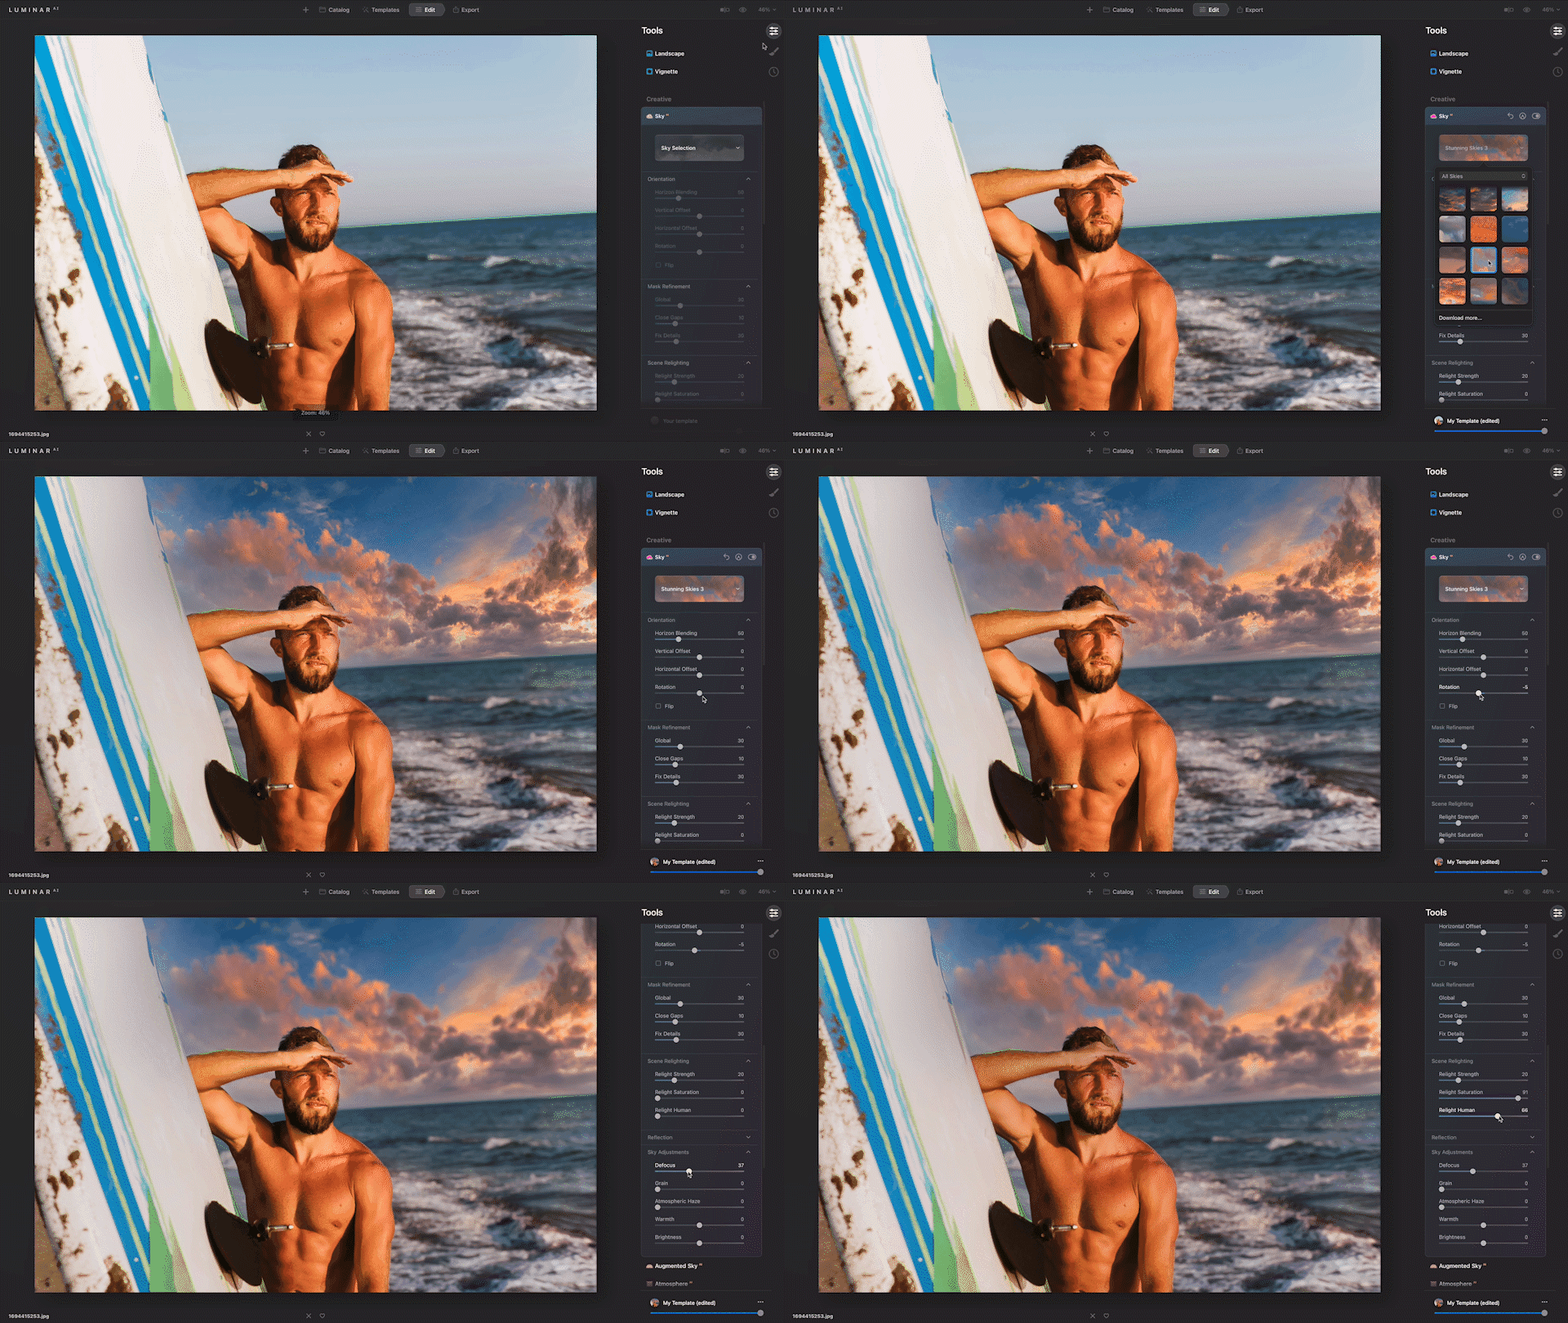
Sky AI is faster and offers a more robust experience. The tool has many new features added and has a new user interface. Visually select the sky you want and instantly have an idea of what your final result will look like. Adding your own skies is easier too. You can add a new sky individually or select a group of skies and add them all at once. 

Relight-19617_1.gif

Sky reflections can now be added to water, and a new Relight Human control has been added to realistically match people in an image with the lighting conditions of the new sky added. Last, freely and precisely position the sky with the new Vertical Sky Offset and Horizontal Sky Offset controls.

Baxter 2016-8900-Edit.jpg

Sky Reflections

Luminar AI will automatically reflect the new sky in the body of water in the most realistic way. The new sky automatically conforms to the angle and depth of the scene to produce incredible results down to the smallest details. Once the new sky is in place, use the Reflection Amount slider to adjust the intensity of the reflection to your liking. 

Sky_AI_4.gif

Scene Relighting

SkyAI now provides realistic scene relighting by eliminating strong color casts from the sky on foreground objects. To control the scene relighting, use the following sliders in Scene Relighting:

  • Relight Amount adjusts how the exposure of the scene matches the new sky.

  • Relight Saturation adjusts the saturation of the relighting effect to add the color from the new sky to the scene realistically.

  • Relight Human controls relighting for any people in the scene, matching people to the new sky for a more realistic effect. Use this slider on environmental portraits and lifestyle photos to see the drastic difference!

Rotate-19560_1.gif

Sky Orientation

One of the toughest challenges in traditional editors is cleanly aligning a new sky to the original horizon. Use the new Orientation controls to align the sky until it is positioned for a perfect fit. This is a great tool for getting the most from untraditional angles, such as in lifestyle photos.

  • Flip your sky to change the direction of the sun.

  • Rotate the new sky on the Z-axis for perfect alignment.

  • You can also freely position the sky with the Vertical Sky Offset and Horizontal Sky Offset controls. Place the sky exactly where you want it in the scene and it will perfectly scale to fit while staying aligned to the horizon.

  • Horizon Blending creates the perfect blend where the sky touches the ground.

Sky Selection and Refinement

Visually select the sky you want from the dropdown list and instantly have an idea of what your final result will look like. We've added six new free skies with this release and made it easier to add your own skies or add new sky packs. Upload your own Custom skies and select them visually. 

Copy multiple skies directly to the custom folder and instantly scroll through them in the preview window.

  • Take care of the small imperfections around the edges of your new sky with the new Fix Details slider.

  • Match new skies to the original photo with the new Grain slider for a seamless, realistic effect.

pasted-image-19646.jpg

Texture Overlays

With Update 2, Local Masking adds new creative abilities. The Texture tool now offers advanced controls to transform texture and image overlays.

PNG overlays

PNG files with transparency can now be uploaded as textures in Luminar AI. These files can be used to add special effects to photos, including watermarks, text, emoticons, and other decorative elements.

Easy placement

New overlay elements can be easily moved, flipped, rotated, resized, and placed anywhere you want. There are even blending modes and masks to precisely control how the object interacts with the original image.

Overlays in Templates

Once applied, an overlay can be synced across multiple images or saved in a custom template for future reuse.

pasted-image-19256.jpg

Discover an improved Templates experience

In Luminar AI Update 2, finding the perfect Template for your photo is even faster. Installing Templates is easier too.

Easy access

To make them easier to find and use, all Templates, including Favorites, My Templates, Purchased, and Legacy Templates, are now available within the main Templates tab, just beneath For This Photo.

New_Cameras_and_File_Formats_hero_image.jpg

Improved camera support

Update 2 brings support for new cameras and file formats to Luminar AI. 

New Cameras

  • Canon EOS R5, Canon EOS R6, EOS 850D, EOS-1D X Mark III (lossy compressed files)

  • Fujifilm X-S10

  • Leica M10-R, S3, SL2-S

  • Nikon Z 5, Z 6 II, Z 7 II

  • Olympus E-M10 Mark IV

  • Panasonic DC-G100 / G110, DC-S5

  • Sony ILCE-7C (A7C), ILCE-7SM3 (A7S III)

  • Zeiss ZX1

New Formats

  • Lossy compressed CR3 files

  • Lossy compressed RAF files

The full list of cameras is available here.

Luminar AI 1.0.1 Update

Gary Detonnancourt

Luminar AI 1.0.1 Update

Great news! The first free update to Luminar AI is here. This update offers a smoother experience and more convenient navigation along with fixes for the most common bugs. Here are the changes you’ll experience.


IMPROVEMENTS


Editing panel navigation

When you open the Edit panel, you’ll now see all of the Edit tools in one list. They’re divided into color-coded categories, but there’s no need to switch between tabs, which allows for a more comfortable editing experience.

tools.gif

Pop-up on Import icon

Enjoy a more intuitive and comfortable interface when importing photos thanks to new visuals. Just click the plus icon in the toolbar and choose whether you’d like to add a folder or a single image. 

popup.gif

Scroll arrows added to For This Photo

Comfortably scroll Templates in the For This Photos section using the left and right arrows. Easily choose from the smart Templates recommended by Luminar AI and make your photos better in one click.

scroll.gif

Redesigned Toning tool

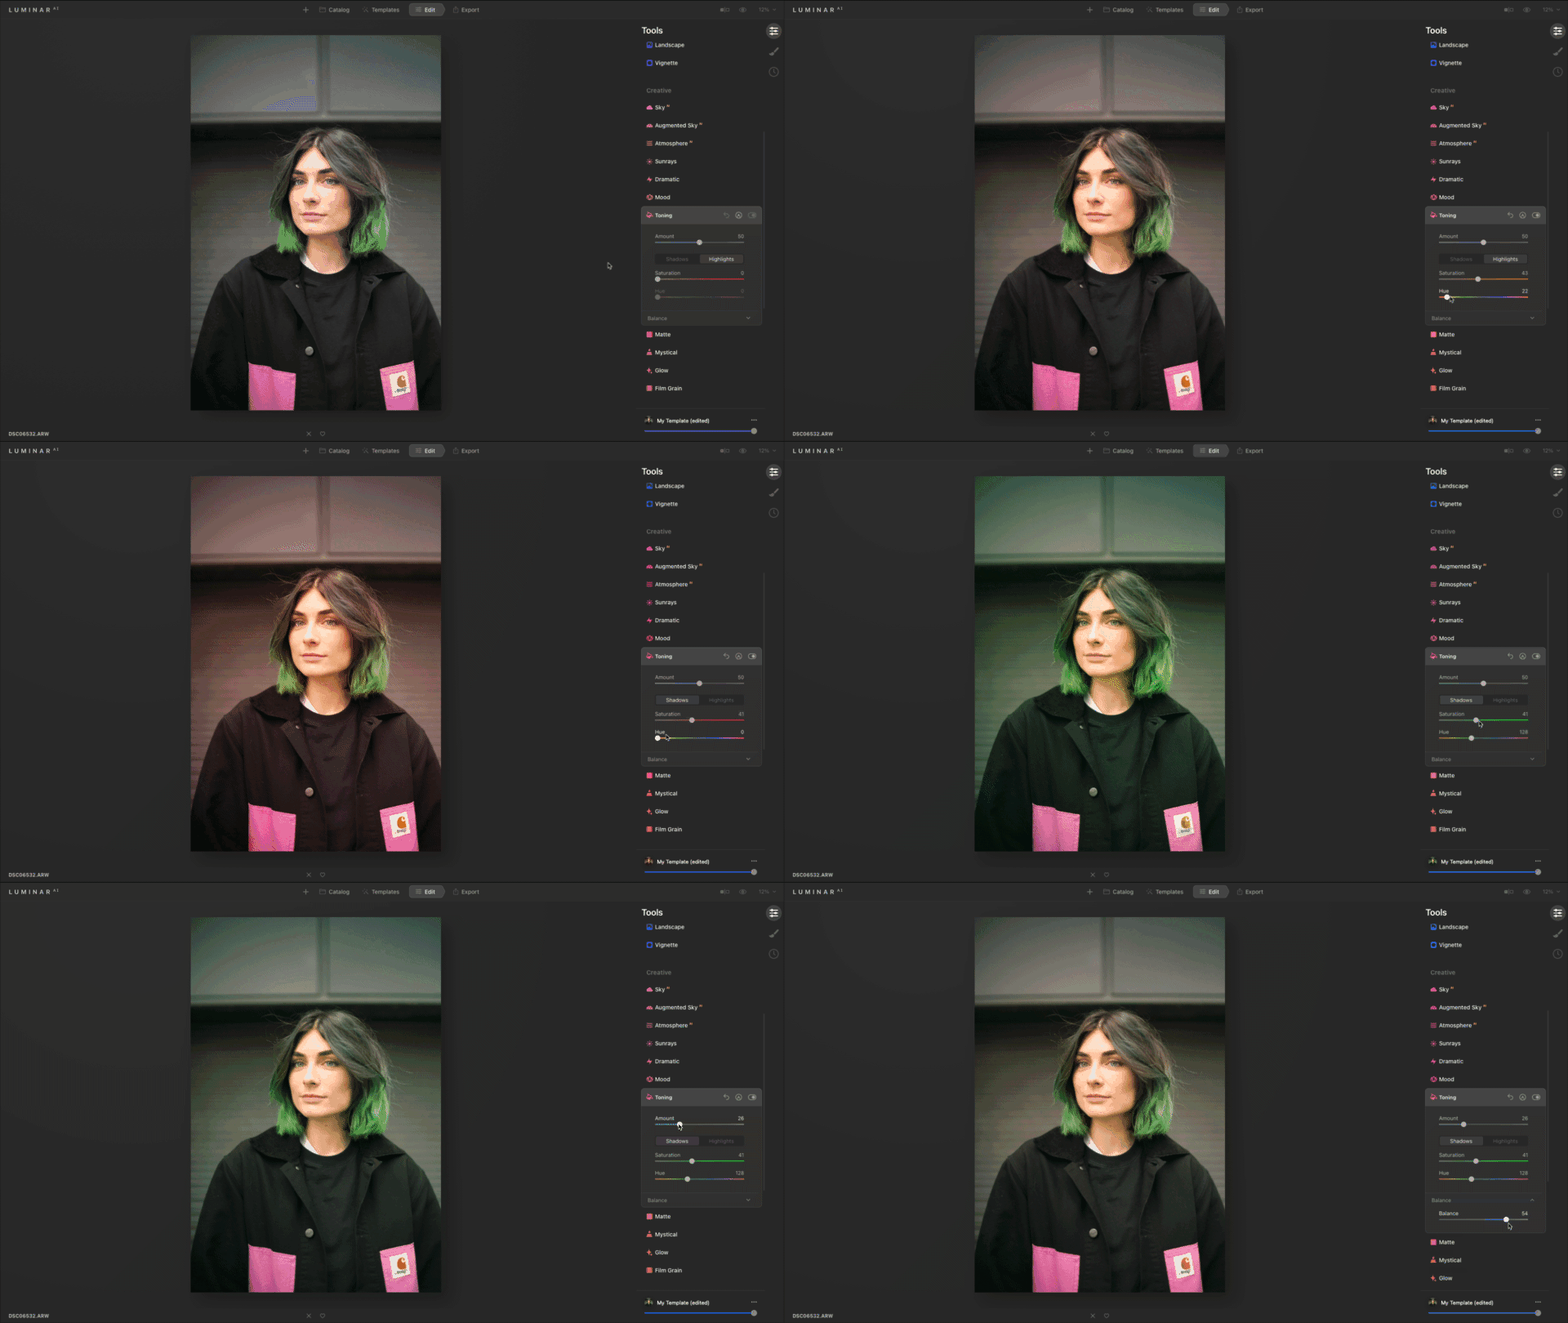
The Toning tool now has Shadows and Highlights buttons and matches the design of other Luminar AI tools.

toning.gif

Tooltips added throughout the software

Hover over the icons in Luminar AI to learn what you can achieve with each feature. Explore Luminar AI in a new way and access all the tools you need.

tooltips.jpg

Localization improvements

We’ve improved the French, German, and Japanese translations in the UI texts. On top of that, the names of Templates in History are now localized.


BUG FIXES

Thanks to everyone who helped us fine-tune the performance of Luminar AI and provided valuable feedback. We've fixed 111 bugs, including 11 major bugs on macOS and including 7 major bugs on Windows that could lead to crashes or unexpected results. 

On macOS:

  • Export photos and replace existing files in folders without crashes

  • Move subfolders within a folder without a hitch

  • Use Clone & Stamp on zoomed photos and enjoy a smooth result, without any artifacts or crashes

  • Smoothly switch between Template previews with no more overlapping of the previous and next Templates preview

  • Add PNG files to your textures in the Local Masking tool

  • Use Cmd+Z or Undo in the Erase tool to go back one step instead of removing all previous adjustments

  • The Sky AI tool now shows all images in the Custom list, including images with the TIFF or TIF extension

  • Install Luminar AI as a plugin in Lightroom and Photoshop in a beat without duplicate files in the plugin folder

...And more! We hope you enjoy the steadier and smoother experience.


On Windows:

  • No more issues with working in the Edit panel, when when the screen is scaled to 150% and you're viewing in full HD

  • Apply changes in the Optics tool and switch to other tools without loss of image sharpness 

  • Experience a smooth, crash-free migration from Luminar 4 even if the Looks folder is inaccessible 

  • Achieve a realistic background blend when adding your custom Objects in PNG format using Augmented Sky AI 

...And more! We hope you enjoy the steadier and smoother experience.


On both Windows & macOS:

  • No more artifacts visible on darker photos when applying Skin AI 

  • No more halo artifacts after working with Erase canvas after Sky Objects are placed

  • Achieve a perfect composition with CompositionAI and use the Vignette tool without crashes


How to update

Luminar AI 1.0.1 is a free update for all Luminar AI users. 

On macOS, you can update by clicking on Luminar AI in the top menu bar and choosing Check for updates. 

On Windows, you can update by clicking LuminarAI in the left-hand corner, then choose Help > Check for updates.

If you’re running Luminar AI as a plugin for Photoshop or Lightroom Classic, we recommend you also rerun the plugin installer. For best results, uninstall the previous plugins and then re-install. Also, make sure you’re Adobe applications are closed when updating.

Plugins.gif

How to Add Skies to Luminar AI for Sky Replacements

Gary Detonnancourt

Free Sky Pack (3 Free Skies)

Save even more by becoming a Snapshot Member and get all of my online classes plus all of my digital assets, such as this Sky Pack, for one low price.

Quick Steps:

Windows 10:

Open Windows Explorer and navigate to: C:\ > Program Files > Skylum > Luminar AI > Profiles > Sky Textures >

Mac:

Ensure Luminar 4 or Luminar AI is not currently running.

Open Finder

Double click on 'Applications' folder

Ctrl+Click on 'Luminar 4' Application icon (or Luminar AI)

Select 'Show Package Contents' from drop down menu

Double click on 'contents' folder

Double click on 'frameworks' folder

Double click on 'MPLuminar4Resources.framework' folder (or MPLuminarAIResources)

Double Click on 'Resources' folder

Double click on 'SkyTextures' Folder

Copy your new sky images into this folder

Start Luminar 4 or Luminar AI and your new Skies will now show within the Sky Replacement presets in addition to built-in skies.

30 High-Quality Images for Sky Replacements
$19.99

30 High-Quality Images for Sky Replacements in Photoshop or Luminar AI. Check the description below for information about how to use these skies to do sky replacements.

Add To Cart

How to Add Your Own Images to Photoshop CC 2021

Gary Detonnancourt

Free Sky Pack (3 Free Skies)

Save even more by becoming a Snapshot Member and get all of my online classes plus all of my digital assets, such as this Sky Pack, for one low price.

30 High-Quality Images for Sky Replacements
$19.99

30 High-Quality Images for Sky Replacements in Photoshop or Luminar AI. Check the description below for information about how to use these skies to do sky replacements.

Add To Cart

How to do a Sky Replacement in Photoshop CC 2021

Gary Detonnancourt

Free Sky Pack (3 Free Skies)

Save even more by becoming a Snapshot Member and get all of my online classes plus all of my digital assets, such as this Sky Pack, for one low price.

30 High-Quality Images for Sky Replacements
$19.99

30 High-Quality Images for Sky Replacements in Photoshop or Luminar AI. Check the description below for information about how to use these skies to do sky replacements.

Add To Cart

How to Focus Stack Images in Photoshop

Gary Detonnancourt

Feel free to download the two images below and try it for yourself.

DSCF1920.JPG
DSCF1921.JPG

If you’re interested in learning more about Photoshop, consider joining my Photoshop course or become a Snapshot Member and get access to all of my online courses and digital assets.

From Photoshop, click File - Scripts - Load Image into Stack

From Photoshop, click File - Scripts - Load Image into Stack

Click Browse to select the images.  Then check Attempt to Align Images.

Click Browse to select the images. Then check Attempt to Align Images.

Click on a layer to select it, then Control or Command Click on the second layer to select it as well.

Click on a layer to select it, then Control or Command Click on the second layer to select it as well.

Click on Edit - Auto Blend Layers

Click on Edit - Auto Blend Layers

Click on Stack Images and check Seamless Tones and Colors.

Click on Stack Images and check Seamless Tones and Colors.

How to Add Texture Overlays to your Images in Photoshop

Gary Detonnancourt

The textures used in this lesson can be downloaded from pexels.com, thanks to Aaron Kitt and Pixabay for these two textures.

Click on File - Place Embedded

Click on File - Place Embedded

Click on the handles around the image to resize it to fit.  Then hit enter on the keyboard.

Click on the handles around the image to resize it to fit. Then hit enter on the keyboard.

Click on the blend modes and roll over each one to see which one will work best for your image.

Click on the blend modes and roll over each one to see which one will work best for your image.

Paint on your mask with black set as the foreground color.  Use a soft brush and set the opacity to 70%, then paint over your subject until the texture has been sufficiently removed from your subject.

Paint on your mask with black set as the foreground color. Use a soft brush and set the opacity to 70%, then paint over your subject until the texture has been sufficiently removed from your subject.

This is my finished image after applying two different texture layers.

This is my finished image after applying two different texture layers.